
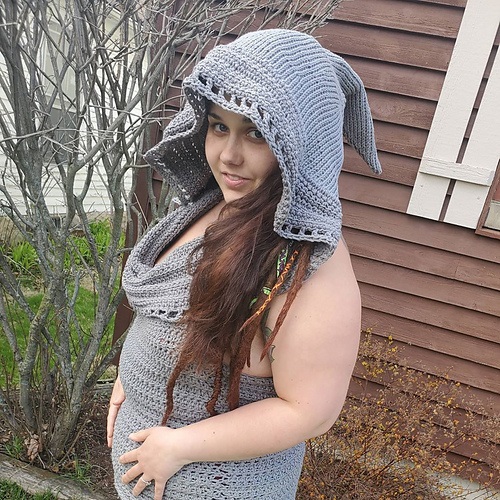
I began crocheting clothing a little less than a year ago. I had a hooded-tribal-style halter top that I loved to wear, yet wanted a different type of hood on it. One that was pointed.
I thought I would have to buy a sewing machine and learn how to sew to get the results I wanted in a top! Thankfully I just needed a little bit of creative thinking and to be inspired by some other wonderful crochet designer’s patterns in order to combine their patterns together to make my dream design!
I used the patterns linked below for the halter top and the hood. You can find the complete pattern at the end of this blog, I just want to give the original designers a shout out because they create beautiful patterns and works! So check out their blogs here:
I really liked the halter top, and didn’t like how the ties dug into my neck. So I wanted a different way to hold it up. An Elven-style hood was my go-to choice, and any hood can work great with this pattern! Since the two are worked separately you can work them independently of each other. Then I recommend connecting them together with the border first and then using stitch makers to determine exactly where you need it.
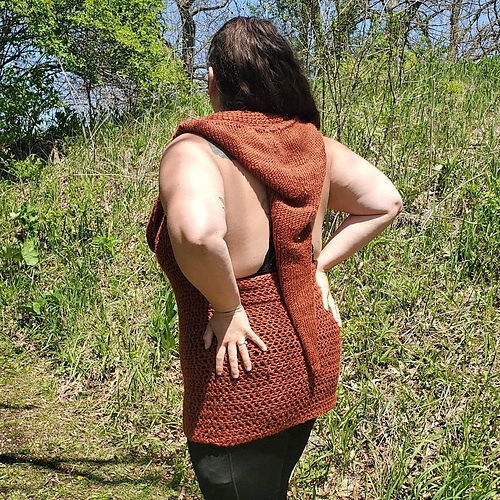
Type of Yarn is any weight category 4. I prefer a cotton yarn, or any other natural fiber over acrylic. Though the orange top is LionBrand Heartland yarn in yosemite and I used about 5-7 skeins of yarn to make this look in a size medium top.
The top is much longer than the pattern calls for, and you can just keep adding rows to determine exactly what length you want.
The Grey top is made with Lily sugar and creme yarn, which was made with a much shorter hood. I needed about 6-7 skeins of this yarn for a medium tunic-length top.
I used the types of hooks called for in the pattern. I used a 6.0mm (J) hook for the top. The hood can be made with a 6.5mm tunisian crochet hook or worked with regular sc with a 4.0mm hook.
One major difference between the orange and grey top is that I used Linked double crochet (ldc) and linked triple crochet (ltr) for the top, which made it less see-through.
Here is the pattern I used, you can adjust the lengths of the top and the hood as needed/desired for length. The hood and the top are worked separately. The border is then worked around the finished hood and top and then sewn together to get the most accurate placing.
SIZES: Small, Medium, Large, and XL
with a Short Hood or a Long Hood (any hood can be attached to this pattern)
Halter Top:
FINISHED MEASUREMENTS (in inches)
To Fit Bust – 32-34(36-38, 40-42, 44-46)
To Fit Waist – 24-26(28-30, 32-34, 36-38)
Finished Width – 15(16, 17. 18)
Finished Torso Length – 16(16, 16, 16)
Finished Bust Length – 14(14, 16, 16)
NOTES
This top is worked from the bottom up in one piece
There are four sizes to this pattern: Small, Medium, Large, and XL
Follow the numbers in parentheses for the larger sizes: S(M,L,XL)
The ch 2 at the beginning of a round does NOT count as a stitch
The ch 4 at the beginning of a row DOES count as a tr
Turning at the end of each round on the Torso ensures that your join seam stays nice and straight – this join seam will run down the side of your top
dc st can be replaced with linked double crochet (ldc) or linked triple crochet (ltr) to make top less see-through.
TORSO
Round 1: Fdc 78(84,90,96). Join with a slst to first fdc. Turn.
Round 2: Ch 2 and (l)dc in the first st. (L)Dc in every st around. Join with a slst to first dc. Turn.
Rounds 3-25: Repeat round 2 twenty-three more times. (I added ~12 rows to get to the length pictured)
Note: if you want more length you can add as many rounds as you want here CONTINUE TO BUST WITHOUT FASTENING OFF.
BUST
Row 1: Ch 4. Tr (or ltr) in the next 38(41,44,47) sts. Turn (leaving the remaining sts unworked).
Row 2: Ch 4 and (ltr)/tr in the same st. (Ltr)/Tr in each st up to the last st. 2 tr in the last st. Turn.
Rows 3-14(14,16,16): Repeat row 2 twelve(twelve,fourteen,fourteen) more times. Note: Each row will increase by 2 sts.
HOOD
The hood is worked separately. It can be lengthened or shortened by removing the extra rows between the increases, this is the pattern for the long hood (pictured above in orange). The pattern below is for the Tunisian version of this pattern, which is done with a 6.5mm Tunisian crochet hook. A similar effect can be make with a 4.0mm (G) regular crochet hook and using sc.
Ch 3.
Row 1: Draw up a loop from the back of each of the next 2 chain stitches. RP. – 3 sts
Row 2: TKS inc in the first space. TKS in the next st. TKS inc in the next space. TKS in the final st. RP. – 5 sts
Rows 3-4: TKS in ea st across. RP. – 5 sts
Row 5: TKS inc in the first space. TKS in the next 3 sts. TKS inc in the next sp. TKS in the final st. RP. – 7 sts
Rows 6-7: TKS in ea st across. RP. – 7 sts
Row 8: TKS inc in the first sp. TKS in the next 5 sts. TKS inc in the next sp. TKS in the final st. RP. – 9 sts.
Rows 9-10: TKS in ea st across. RP. – 9 sts
Row 11: TKS inc in the first sp. TKS in the next 7 sts. TKS inc in the next sp. TKS in the final st. RP. – 11 sts
Row 12-13: TKS in ea st across. RP. – 11 sts
Row 14: TKS inc in the first sp. TKS in the next 9 sts. TKS inc in the next sp. TKS in the final st. RP. – 13 sts
Rows 15-16: TKS in ea st across. RP. – 13 sts
Row 17: TKS inc in the first sp. TKS in the next 11 sts. TKS inc in the next sp. TKS in the final st. RP. – 15 sts
Rows 18-19: TKS in ea st across. RP. – 15 sts
Row 20: TKS inc in the first sp. TKS in the next 13 sts. TKS inc in the next sp. TKS in the final st. RP. – 17 sts
Row 21-22: TKS in ea st across. RP. – 17 sts
Row 23: TKS inc in the first sp. TKS in the next 15 sts. TKS inc in the next sp. TKS in the final st. RP. – 19 sts
Rows 24-25: TKS in ea st across. RP. – 19 sts
Row 26: TKS inc in the first sp. TKS in the next 17 sts. TKS inc in the next sp. TKS in the final st. RP. – 21 sts
Rows 27-28: TKS in ea st across. RP. – 21 sts
Row 29: TKS inc in the first sp. TKS in the next 19 sts. TKS inc in the next sp. TKS in the final st. RP. – 23 sts
Rows 30-31: TKS in ea st across. RP. – 23 sts
Row 32: TKS inc in the first sp. TKS in the next 21 sts. TKS inc in the next sp. TKS in the final st. RP. – 25 sts
Rows 33-34: TKS in ea st across. RP. – 25 sts
Row 35: TKS inc in the first sp. TKS in the next 23 sts. TKS inc in the next sp. TKS in the final st. RP. – 27 sts
Rows 36-37: TKS in ea st across. RP. – 27 sts
Row 38: TKS inc in the first sp. TKS in the next 25 sts. TKS inc in the next sp. TKS in the final st. RP. – 29 sts
Rows 39-40: TKS in ea st across. RP. – 29 sts
Row 41: TKS inc in the first sp. TKS in the next 27 sts. TKS inc in the next sp. TKS in the final st. RP. – 31 sts
Rows 42-43: TKS in ea st across. RP. – 31 sts
Row 44: TKS inc in the first sp. TKS in the next 29 sts. TKS inc in the next sp. TKS in the final st. RP. – 33 sts
Row 45-46: TKS in ea st across. RP. – 33 sts
Row 47: TKS inc in the first sp. TKS in the next 31 sts. TKS inc in the next sp. TKS in the final st. RP. – 35 sts.
Rows 48-49: TKS in ea st across. RP. – 35 sts
Row 50: TKS inc in the first sp. TKS in the next 33 sts. TKS inc in the next sp. TKS in the final st. RP. – 37 sts.
Rows 51-52: TKS in ea st across. RP. – 37 sts
Row 53: TKS inc in the first sp. TKS in the next 35 sts. TKS inc in the next sp. TKS in the final st. RP. – 39 sts
Rows 54-55: TKS in ea st across. RP. – 39 sts
Row 56: TKS inc in the first sp. TKS in the next 37 sts. TKS inc in the next sp. TKS in the final st. RP. – 41 sts
Rows 57-58: TKS in ea st across. RP. – 41 sts
Row 59: TKS inc in the first sp. TKS in the next 39 sts. TKS inc in the next sp. TKS in the final st. RP. – 43 sts
Rows 60-61: TKS in ea st across. RP. – 43 sts
Row 62: TKS inc in the first sp. TKS in the next 41 sts. TKS inc in the next sp. TKS in the final st. RP. – 45 sts
Rows 63-64: TKS in ea st across. RP. – 45 sts
Row 65: TKS inc in the first sp. TKS in the next 43 sts. TKS inc in the next sp. TKS in the final st. RP. – 47 sts
Rows 66-67: TKS in ea st across. RP. – 47 sts
Row 68: TKS inc in the first sp. TKS in the next 45 sts. TKS inc in the next sp. TKS in the final st. RP. – 49 sts
Rows 69-70: TKS in ea st across. RP. – 49 sts
Row 71: TKS inc in the first sp. TKS in the next 47 sts. TKS inc in the next sp. TKS in the final st. RP. – 51 sts
Rows 72-73: TKS in ea st across. RP. – 51 sts
Row 74: TKS inc in the first sp. TKS in the next 49 sts. TKS inc in the next sp. TKS in the final st. RP. – 53 sts
Rows 75-76: TKS in ea st across. RP. – 53 sts.
Row 77: TKS inc in the first sp. TKS in ea of the next 12 sts. (TKS inc in the next sp. TKS in ea of the next 13 sts) 3 times. TKS inc in the next sp. TKS in the final st. RP. – 58 sts
Rows 78-79: TKS in ea st across. RP. – 58 sts
Row 80: TKS inc in the next sp. TKS in ea of the next 14 sts. (TKS inc in the next sp. TKS in ea of the next 14 sts) 3 times. TKS inc in the next sp. TKS in the final st. RP. – 63 sts.
Rows 81-82: TKS in ea st across. RP. – 63 sts
Row 83: TKS inc in the next sp. (TKS in ea of the next 15 sts. TKS inc in the next sp) 4 times. TKS in ea of the next 2 sts. RP. – 68 sts
Rows 84-85: TKS in ea st across. RP. – 68 sts
Row 86: TKS in the next st. (TKS inc in the next sp. TKS in ea of the next 16 sts) 4 times. TKS inc in the next sp. TKS in ea of the next 2 sts. RP. – 73 sts
Rows 87-88: TKS in ea st across. RP. – 73 sts
Row 89: TKS in the next st. (TKS inc in the next sp. TKS in ea of the next 17 sts) 4 times. TKS inc in the next sp. TKS in the next 3 sts. RP. – 78 sts.
Rows 90-91: TKS in ea st across. RP. – 78 sts
Row 92: TKS in ea of the next 2 sts. (TKS inc in the next sp. TKS in ea of the next 18 sts) 4 times. TKS inc in the next sp. TKS in the next 3 sts. RP. – 83 sts
Rows 93-94: TKS in ea st across. RP. – 83 sts
Row 95: TKS in ea of the next 2 sts. (TKS inc in the next sp. TKS in ea of the next 19 sts) 4 times. TKS inc in the next sp. TKS in ea of the next 4 sts. RP. – 88 sts
Rows 96-97: TKS in ea st across. RP. – 88 sts
Row 98: TKS in ea of the next 3 sts. (TKS inc in the next sp. TKS in ea of the next 20 sts) 4 times. TKS inc in the next sp. TKS in ea of the next 4 sts. RP. – 93 sts
Rows 99-100: TKS in ea st across. RP. – 93 sts
Row 101: TKS in ea of the next 3 sts. (TKS inc in the next sp. TKS in ea of the next 21 sts) 4 times. TKS inc in the next sp. TKS in ea of the next 5 sts. RP. – 98 sts
Rows 102-103: TKS in ea st across. RP. – 98 sts
Rows 104-121: TKS in ea st across. RP. – 98 sts
Cut yarn and tie off.
Seaming the Hood
Fold the large triangle down the center length so that the right sides of the fabric are facing each other and the wrong sides are out. With a tapestry needle and a length of yarn, make a whip stitch seam starting at the point of the hood until there are ~25-30 rows remaining.
Connecting the Hood and Top
Border
Start with the border to connect the top.
Attach yarn on edge of hood or top, ch-2, then work a in-the-round border of at least 4 rounds of ldc slst in top of beg of each ch-2 at beginning of round.
Turn to add an extra round of ldc over the hood only for a larger hood effect. Add as much of a border as you want here! I wouldn’t go more than 8 rounds here though, I have only done a total of 5 rows (including the extra round on the hood).
Ch-4, dc, sk a chain, ch-1 all the way around slst in 3rd chain of beg ch-4.
Then ch-1, sc in ea sc and dc all the way around, slst in beg ch-1. Tie off and weave in ends.
Sewing the pieces together
I definitely recommend using stitch markers to place your hood and try it on prior to sewing if possible! This pattern is untested, and has only been worn by me. Since the border holds the hood and the top together, this should make this process easier. This is how it worked well for me:
I left ~10 stitches of the hood unworked and unsewen to be able to pull it over my head. I sewed the hood on starting between the 5th and 6th rows of tr crochets on the top. I sewed 2-3 st on the hood in one tr on the top using a mattress stitch going forward and backwards, so the knot to finish off is in the back of the hood. Then finish off.
Now you have an Elven Hooded Halter Top!
Someone on ravelry is combining this with a dragon hood, and it inspired me to make a dragon version too with some sage green yarn! Check out my ravelry when the project is finished!
~T
Update as of 6/26/20: I have an ad-free PDF version available in my Ravelry shop

