I have been working on some big projects lately. I have a big dragonscale/crocodile stich hooded cloak pattern in the works. I have also been making a ton of baby blankets. I needed something that I could finish quickly and that is useful! Thankfully I had some Lily Sugar n Cream Scrub off yarn lying around (plus some that was on sale), so I came up with this cute little scrubby pattern!
I originally wanted to make this as a cheaper, reusable alternative to buying exfoliating loofahs. Then I realized that these would be great for washing dishes. Yes, I have to wash my dishes by hand. I was using some handmade crocheted scrubbies from my local farmers market, but they fell apart pretty easy and weren’t made of cotton material like this yarn is!
So far, I have only washed the dishes with them, and I think they will be great for lightly exfoliating the skin as well. Which is great because my partner likes to scrub really hard after working. So, we can see how these hold up for dishes and for other hygiene purposes! You could even use these for cleaning the house or bathroom if you really wanted to! I would suggest making separate ones for each purpose though… They will make great gifts that even a beginner can make quickly and easily!
If you want a pdf copy of this, I will have it available for purchase on my ravelry store. It would really help me out. Otherwise, please enjoy this free pattern below! Happy stitching!
Circle Scrubby with Handle
Materials Needed:
1 skein of Lily Sugar n’ Cream Scrub Off yarn (one skein will make you 3+ circle scrubbies)
G7(4.0mm) Crochet Hook
Yarn Needle
Scissors
Pattern:
Abbreviations:
Ch= chain
rnd= round
st= stitch
sc= single crochet
Sl st= slip stitch
Circles (Make 2. *note: you can make two of the same size, or you can make one that is slightly smaller than the other. The latter will result in a raised edge in the final product, and I prefer this design over the same size ones. Both are pictured. Additionally, you can make one side regular yarn and one side scrubby yarn or you can mix it up. Both options are pictured, even though only the scrubby side is the “bigger” circle in the picture.)
Ch 3 or magic loop rnd 1: 6 sc in 2nd ch from hook. Sl st in first sc. Ch 1. (6 sc)
rnd 2: 2 sc in first st and each around. Sl st in first sc. Ch 1. (12 sc)
rnd 3: *2 sc in first st, 1 sc in next; rep from * around. Sl st in first sc. Ch 1. (18 sc)
rnd 4: *2 sc in first st, 1 sc in each of the next 2 sts; rep from * around. Sl st in first sc. Ch 1. (24 sc)
**rnd 5: *2 sc in first st, 1 sc in each of the next 3 sts; rep from * around. Sl st in first sc. Ch 1. (30 sc)
**optional: stop here for a smaller scrubby**
**rnd 6: *2 sc in first st, 1 sc in each of the next 4 sts; rep from * around. Sl st in first sc. Ch 1. (36 sc)
**optional: make this the “bigger” scrubby (see note above) or make this the “smaller” scrubby for a raised edge)**
**rnd 7: *2 sc in first st, 1 sc in each of the next 5 sts; rep from * around. Sl st in first sc. Ch 1. (36 sc)
**optional: for a big, palm-sized scrubby or for a bigger, raised edge scrubby (see note above and )**
On the first circle, finish off and weave in ends, or weave ends in when joining circles (step 2)
On the second circle, continue working in the round for step 2.
Sc all the way around. (sc count depends on what size you chose in step 1)
If you made one side bigger than the other, skip every other sc on the bigger circle so that your scrubby is even. Therefore, the st count will always be what your smaller circle st count is in step 1.
Sl st in first sc
If making without a handle, finish off, and weave in ends
Ch 25 (ch more if you want a longer handle, I find this is a pretty good number for hand sizes, and remember-cotton will stretch out over time!)
**This is optional, and a picture of what these look like without a handle is also pictured**
Sl st in first sc.
**optional: add more sl st around handle, I did this because it felt more secure**
Finish off and weave in ends.
Enjoy your new scrubby! Use it for washing or cleaning just about anything! Even for exfoliation!
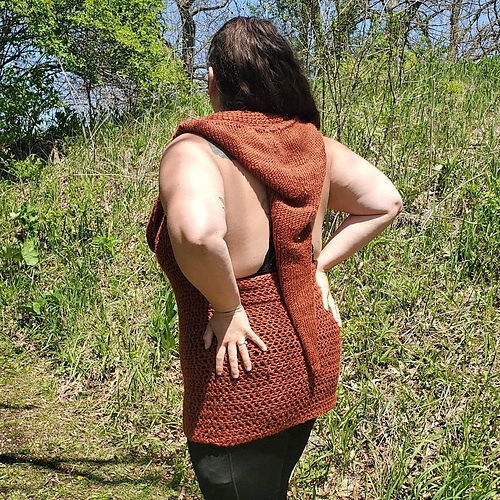
I saw a sweater on Amazon, and thought to myself, “I could make that myself, and customize it with what I want in a sweater.” Hence, why I started a new WIP between projects. Particularly because it is sweater season.
I started with the sleeve cuffs because I wanted to ensure I had enough yarn in the color I wanted. Yes, I am using scrap yarn for my “Big Bulky Sweater” pattern. Be on the lookout for that pattern in my Ravelry Store https://www.ravelry.com/designers/tiffany-burton
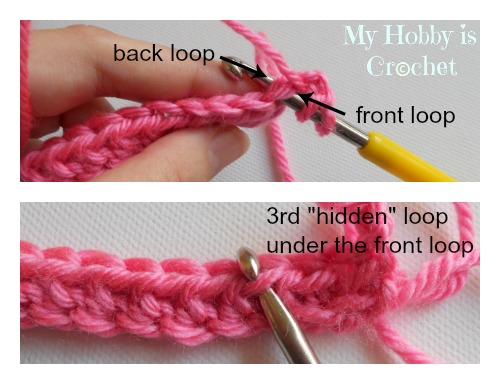
This pattern works in the round, have raglan sleeves, and minimal sewing. The fingerless gloves/thumbhole cuff will only have to be sewen onto the sleeves. These are worked in the round. To get the “stripe”-like effect, I worked with the 3rd hidden loop which is described in the referenced picture below.
Hook: G (4.5mm hook)
Yarn: Any worsted weight yarn, I like the Lily Sugar and Cream yarn and will also be working with Lion Brand Pound of Love.
Stitches: ch (chain), hdc (half-double crochet), hdc in hidden loop (see photo below) sl st (slip stitch)
Foundation row: make a slipknot and ch 22-30 (depending on hand size, my hand/wrist is very small, so 22 is enough for me; bigger hands/wrists will require more stitches!). Sl st to first ch. You will always have as many sts as your foundation chain number for every row.
Row 1: Ch-1, hdc in same st, hdc in each ch around. Sl st to first hdc st.
Row 2: Ch-1, hdc in same st, hdc in 3rd hidden loop around, sl st to first hdc st.
Row 3: Ch-1, hdc in same st, hdc in each hdc of previous round, sl st to first hdc st. (repeat rows 2 &3 until a suitable length on the hand is reached, for me, this was only these 3 rows).
Row 4 (this is where you will begin the thumbhole): Ch-1, hdc in same st, hdc in 3rd hidden loop around, turn.
Row 5: Ch-1, hdc in same st, hdc in each hdc of previous round, turn.
(Repeat rows 4&5 [a.k.a. “turning rows] until you reach a favorable diameter for the thumbhole. For me, and my small hands, this was only 4 turning rows, up to 6 rows may be necessary for bigger hands).
Row 6: On the final turning row, whether it is the regular hdc st, or the hdc in the 3rd hidden loop st, sl st to first hdc. Then follow the pattern for rows 2 & 3 until you reach the desired length for your gloves or cuffs! I only did an additional 5 rows.
That is the only definition from the Merriam-Webster dictionary that does not include the word ‘Intuition’ in its definition. That definition makes sense with Albert Einstein’s quote in the above image. Yet, it leaves out the experience of what being intuitive or what intuition actually is.
In the description of Marriam-Webster’s definition of “intuitive”, they first relate it to “intuitive interface” of smartphones and other technology. Since it is simple and easy to use. The dictionary then relates it to the noun intuition in terms of a “sixth sense”, ESP, and the intuitive sub-stage of cognitive development.
The dictionary makes these processes all seem different, and it feels like it is written to seem illogical to have these experiences. I am here to tell you that it is completely fine to experience these things. Also, if you don’t experience these things, that is alright too; but denying another’s intuition because it seems illogical or is calling out something within yourself you are attempting to hide is harmful. Both to yourself and the intuitive.
For example, I had an ex that cheated on me. I physically felt a cord to my heart being cut when he cheated on me once. I knew he cheated on me, even though we were separated by half of the United States. I even asked him about it in person when he got back, and he denied it.
This was damaging on a physical, mental, and relational level for me. I had no facts, except for the feeling I had physically experienced regarding it. I became very sick afterwards, and carried a lot of internal confusion. A few months later, I could not let my experience go, and he finally confessed to cheating on me.
After that experience, I vowed to listen to my intuition and to my body. Since the mind is connected to the body, obviously both the rational and intuitive mind are connected to it. Like my molecular biology teacher, Dr. Rad, always said, “Structure=Function!”. The structure allows for the function to occur, which is true on the micro- and macro-scale of existence. Basically, since the mind and body are connected, obviously they function together.
The “Functioning” of the body and mind together occurs on all unconscious, subconscious and conscious levels. The unconscious parts are slightly more obvious to us since that is what we study in anatomy classes, and we would not be alive or breathing if not for these unconscious processes. The “Functioning” of these conscious levels are what help get us through school, our daily lives, how we utilize our bodies, communication with others, and form our beliefs. The subconscious parts are a little fuzzier.
The subconscious levels of functioning are usually defined by our dreams, and other things that are outside our full awareness. For years, many psychologists and “New Age” believers are attempting to make the subconscious more conscious and aware. This is what I think of when people say someone is aware of themselves or “awakened”. They have made strides in being aware of things that were not in their full awareness. Is this that “inner work” people keep raving about?
Anyways, enough with that rant. How does this relate to intuition and the intuitive mind? That is a great question I do not have an exact answer to. The intuitive mind seems to act as a mediator of the subconscious mind to the conscious mind to allow intuitions, and other information to be processed more easily by the mind and by the body. It is the bridge that connects the different levels of the mind together, yes even the unconscious parts.
It seems like intuition within our intuitive mind occurs mostly at a subconscious level, since it is always active; but doesn’t always require our full attention. It is able to cross over the bridge to influence our consciousness or our unconscious mind. It can cause a sense of “fight-or-flight” that influences both unconscious and conscious mechanisms. Intuition is a part of human experience, and it is stronger in some individuals than others.
Intuition through the intuitive mind is an important part of obtaining a “flow state”, and can be used to aid in decision-making. Yes it is a “gut-feeling”, but it can occur anywhere in your body. I have read some women experience it within their vaginas or through their hearts. Some people it occurs more as a mental feeling, and some it is more physical feeling. Intuition can be communicated in a multitude of ways, at any time, during any situation.
Experiencing intuition as an intuitive is like a feeling of “just knowing”. Whether that “knowing” refers to something that occurred, or a problem that is attempting to be solved. It just comes to you suddenly and it all makes sense, even if the path that got you to the “knowing” is nonlinear.
Do you just understand concepts easily like an intuitive? Do you experience strong intuition? Both? Let me know your thoughts!
The best present you can give yourself is being present
— FractalTz
This is the first post on my new blog. I’m just getting this blog going, so stay tuned for more. Subscribe below to get notified when I post new updates.
Aiming to be more present is vital. Part of being present is being grounded. Grounded in your body, your mind and your spirit. There is no time except for the now. Some say that everything is happening now.
I find it especially easy to be grounded in the body, like most people do. It feels like reality, I can see the physical things with my eyes. Feeling my skin, muscles, organs and other bodily functions is simple. I can taste or touch things to get grounded. Another way to get grounded physically is to do progressive muscle relaxation.
Or simply just sit your butt on the ground!
The mind is a physical organ composed of emotions and thoughts. Since it is a physical organ in the body, it can influence it. Hence the term my mother always said, “Stress kills“. Or why psychosomatic symptoms occur in mental dis-ease(s).
Getting mentally grounded can be more difficult. It’s a much longer process. I feel it actually integrates part of the spirit since it can include getting to know personal values, morals and beliefs. It also requires a processing of life events
It requires a certain amount of focus, concentration and determination. It is basically taking time to get to know yourself, your thought patterns, and what you want for yourself. Then maintaining that process to allow choices to be made in line with our spirit’s path.
If mental grounding is so difficult, spirit grounding just seems almost imaginary. Good thing we are limitless and can imagine anything, right?
For example, imagine love. Or will power.
Lots of different feelings, emotions and memories can come to mind. It keeps expanding. It can be both given and received. It is something that is cultivated within.
They are not physical things, but are felt. It is more than a mental conceptualization. These are things that are imprinted into your spirit and grow with you throughout your life. These are the limitless aspects of being human.
Any other ways you can think of to be grounded in the body, mind or spirit? Let me know! Thanks for joining me in getting grounded in this blog!
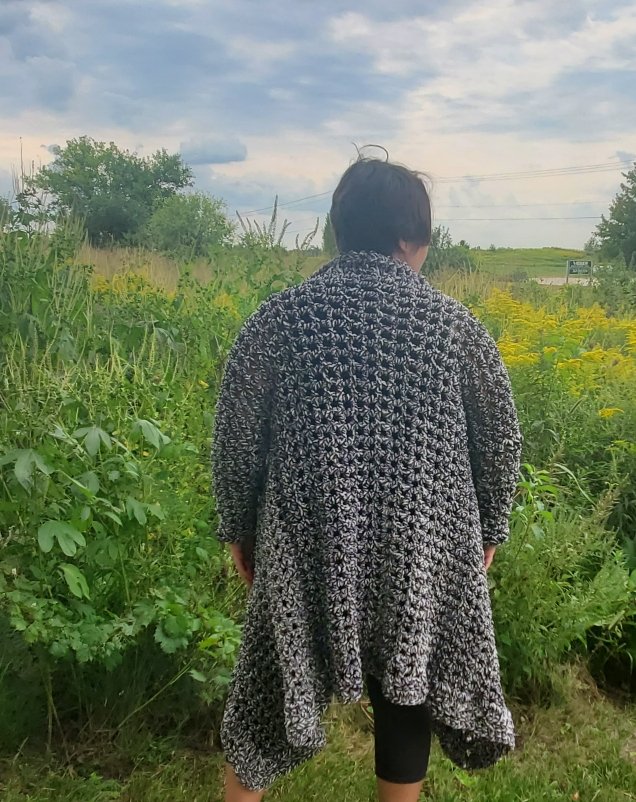
Sweater weather is coming! Crochet your own sweater in about a weekend with this simple guide. It can easily be adapted to any size, any yarn and you can try any stitch. As long as it looks good turned 90 degrees!
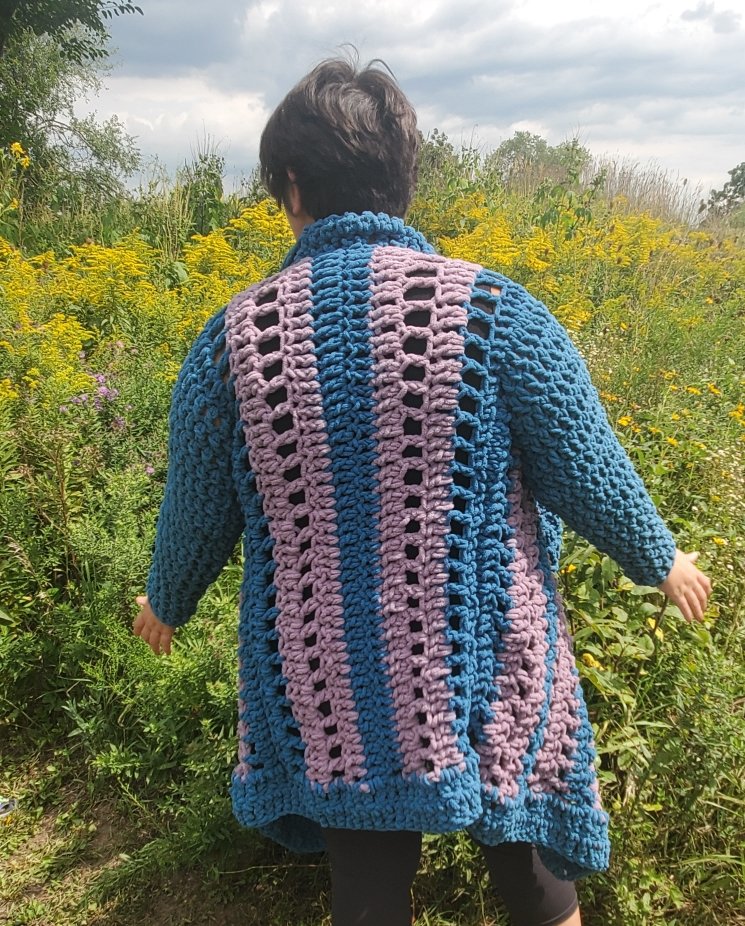
This is a guide to make a flowy, crochet Cardigan. I provide a filet/mesh pattern here for free and a treble, double X-stitch pattern in the pdf located in my ravelry store Here. Please feel free to use any other stitch that makes a square. Gauges are based off of weight 6, bulky yarn; and I also include the gauge for weight 4, worsted yarn. Keep in mind that the squares are worked side to side (not in vertical direction), so ensure you enjoy the stitch pattern in the horizontal direction. The Cardigan is constructed in this manner.
Mesh/Filet Crochet in bulky weight yarnMesh/Filet Crochet in bulky weight yarn
You will make 3 rectangle panels, turn them horizontally, sew them together, make armholes, create arms in the round (or make squares and sew them onto the armholes, I am not a fan of this method), and then finish with a trim around the edges to clean the piece up. If using a bulky yarn, like Bernat Blanket Yarns, it will create a cozy, blanket-like Cardigan that will keep you warm and cozy.
Yarn: Super Bulky Yarn weight 6, weight 4, or any (follow measurements rather than gauge)
Hook: 9mm hook for weight 6 or 5.5mm hook (or hook recommended for yarn type)
Scissors and Yarn Needle
4 rows and 8 dc+ ch-1 in 4-inch space for weight 6, 6 rows and 8 dc+7 ch-1 in 4-inch space for weight 4.
Measure Bust, take measurement in half. For example if the bust is 40in, you will make 18-20in worth of rows for the back panel, approximations are fine since the yarn has some give. This will be the numbers of rows you will make, or just keep going until you reach the measurement. Generally, US bust size small is 32in-35in, medium is 35in-38in, and large is 38in-42in.
Panel Pattern:
(make 3 equal panels, or make 1 to bust measurement and 2 panels that have equal row counts, more rows than the 1 panel. These will have similar effects, and the latter will have a longer front.)
Fdc: Chain the length of the sweater you want in multiples of 4+1. If using bulky weight yarn, 45-65 ch will go below your bottom in the back. And 73 ch will hit at about the top of the hips for weight 4 yarn.
Row 1: Ch-4, *sk next st, dc in next st, ch-1* repeat until last 2 ch sps, sk next ch space and dc in last ch sp. (Or follow personalized st pattern, X-stitch is below)
Row 2: Ch-4, *dc in next dc st, ch-1* repeat until last 2 ch sps, sk next ch space and dc in 3rd ch of last ch-4 sp.
Repeat row 2 until bust measurement is made. Make 2 more equal panels for the front. Turn the pieces sideways and sew them together with a needle or your hook. Leaving space for armholes (measure arm diameter and cut in half to determine how much space to leave, e.g. if arm diameter is 16in, leave 8 in on each panel) the shoulders together, 6 dc+1 ch sps to make armholes. Generally, size small is ~12in, medium is ~14in and large is ~16in
Arms Pattern:
Row 1: Join at bottom of armpit in seam. Ch-4, *dc in next dc(looking) st, ch-1* repeat until last 2 ch sps, sk next ch space and dc in last dc(looking) sp, sl st in 3rd ch of ch-4 space. (Or simply replace with ch-3, dc all the way around, see picture below for example)
Repeat Row 1 until Row 7, then begin dec row
Row 7-14: Ch-4, sk next dc + ch-1, *dc in next dc st, ch-1* repeat until last 2 ch sps, sk next ch space and dc in 3rd ch of last ch-4 sp. (Or ch-3, dc2tog, dc around until last 2 sts, dc2tog, then join to 3rd ch of ch-3.)
Repeat Row 1 until wrist is met (total of 20+ rows, depending on arm length)
Trim on arms: ch-4, *tr in dc, sk ch-1 sp* sl st in 4th ch of ch-4 space. Sl st in every st in round. Finish off and weave in ends.
Repeat on other arm.
Trim around sweater: *optional: separate trim from front and back panels, or just work in the round* Join yarn at the bottom near the seam, Ch-4, tr st in every chain around. Turn work, ch-4, tr st in every chain around. Finish off and weave in ends.
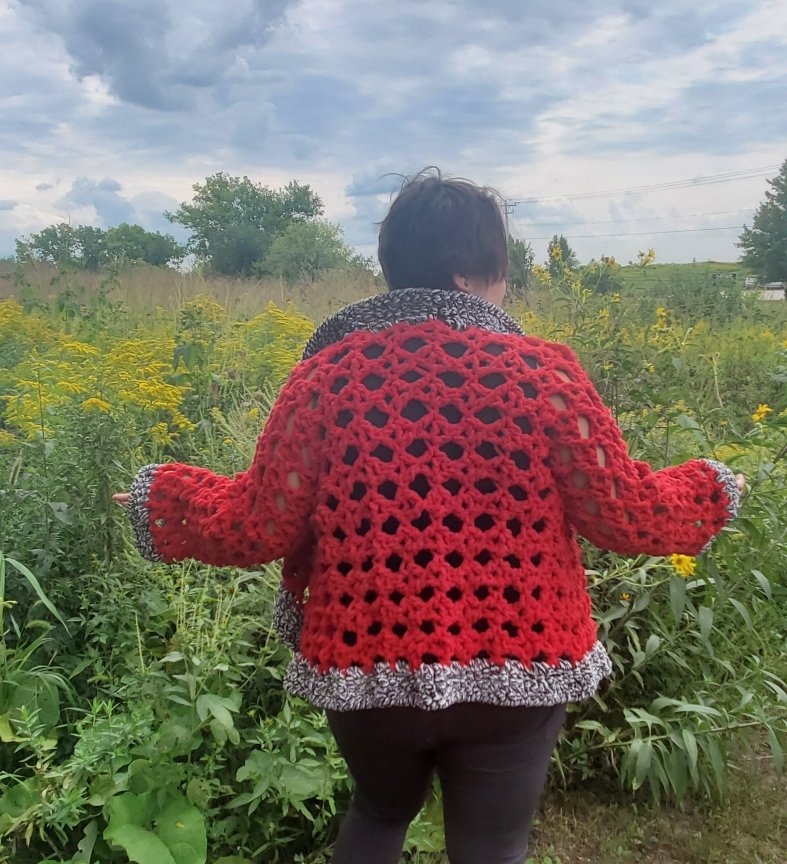
Different stitch pattern. A combination of dc and mesh in a bulky weight yarn. Very warmWeight 4 x-stitch Cardigan. Pattern available HereBack of weight 4 x stitch. Pattern available HereBulky X-stitch Cardigan. Pattern available HereBack of bulky x- stitch Cardigan.
In my undergraduate Research Methods course, we had to learn the difference between these two types of experiences. I have been coming across these things again in the study of morals, and in some ways these concepts seem to be impacting current events significantly. Now, we can study both subjective and objective realities in science. Additionally, a researcher can attempt to make the subjective into something objective.
To make sense of this, we have to first understand the difference between a subjective reality and an objective reality. Subjective reality is like personal experience, it varies from individual to individual, some examples a thought, opinion or an emotion. While objective reality is rooted more in something outside of ourselves that is observable and measurable by multiple individuals.
Subjective data is usually gathered in “qualitative studies” while objective data is usually gathered in “quantitative studies”. For example, in social and psychological science, qualitative studies need to be performed prior to quantitative studies being performed. So that the quantitative measure has an empirical foundation to build from. It does not make it less valid, it is just a way to make the subjective experience objective.
Although, having a whole society think this is the same as complete objective science, like the concept of gravity, seems misleading to an extent. A subjective experience could include “I don’t think/feel/believe gravity exists” and objective experience would bring you to ask questions like, “then how do you explain your weight on the scale?” or “how do you explain the reasons we can only walk on the ground and not on the walls?”. That is an extreme example, but it is always good to question the subjective experience with objective questions.
Making the subjective reality an objective reality seems to be what many people in modern mainstream culture tend to do. Concepts like “that’s what you believe” and other postmodern thought processes are predominating the mainstream thought culture, even in psychological research. The list of what we would consider objective reality is shrinking and getting foggier as time goes on. Even as science has progressed, our objective realities have gotten less clear as time has gone on.
What do you think about this? What are some objective and subjective truths you can name? Please like and comment so we can discuss more!
New Year, time for some new behaviors to make myself anew. Right? We all do that, and how do you plan to do that?
I’ve got my own goals that I was working on prior to the new year, and it got me thinking. What’s the difference between fasting and abstinence? How does refraining from something differ between those two things?
After some research into definitions and different religious meanings to these words, particularly fasting and abstinence, they are very different. Having these perspectives in mind may change how your goals for the new year.
Fasting is complete withholding of something for an intended purpose. It can be food, thoughts or other things that can be consumed or consuming. It can be done for health, spiritual, or other personal reasons.
One Merriam-Webster definition of abstinence literally says “the practice of not having or doing something that is wanted or enjoyable”. It’s no wonder sexual abstinence teaching doesn’t do very well in the public school system with this definition. It seems like if we choose to abstain from something, we are just asking to be tempted.
Now it seems like fasting and abstinence are similar. The intention behind the words are much different. Fasting has a specific defined purpose, a reason behind the action. Abstinence seems to lack that and makes the practice of withholding even more difficult.
Finally, refrainment is slightly more intentional as well, and the root word “refrain” is actually a repetitive sequence in a musical piece. It is not spontaneous, and is usually given as a directive towards others. For example, most speakers usually ask you to refrain from asking questions until the end of their discussion. This is because the speaker may answer your question in their talk and wants to avoid repeating themselves to save time.
So, think about your goals. Are you intentionally fasting? Are you abstaining from something enjoyable? For what purpose are you doing these things? Do you find yourself in a refrain and need to practice some refrainment?
I hope this article made you think and evaluate your goals to make them even clearer for you. I hope you are successful this year in all your goals! Feel free to comment and discuss any thoughts or questions you may have.
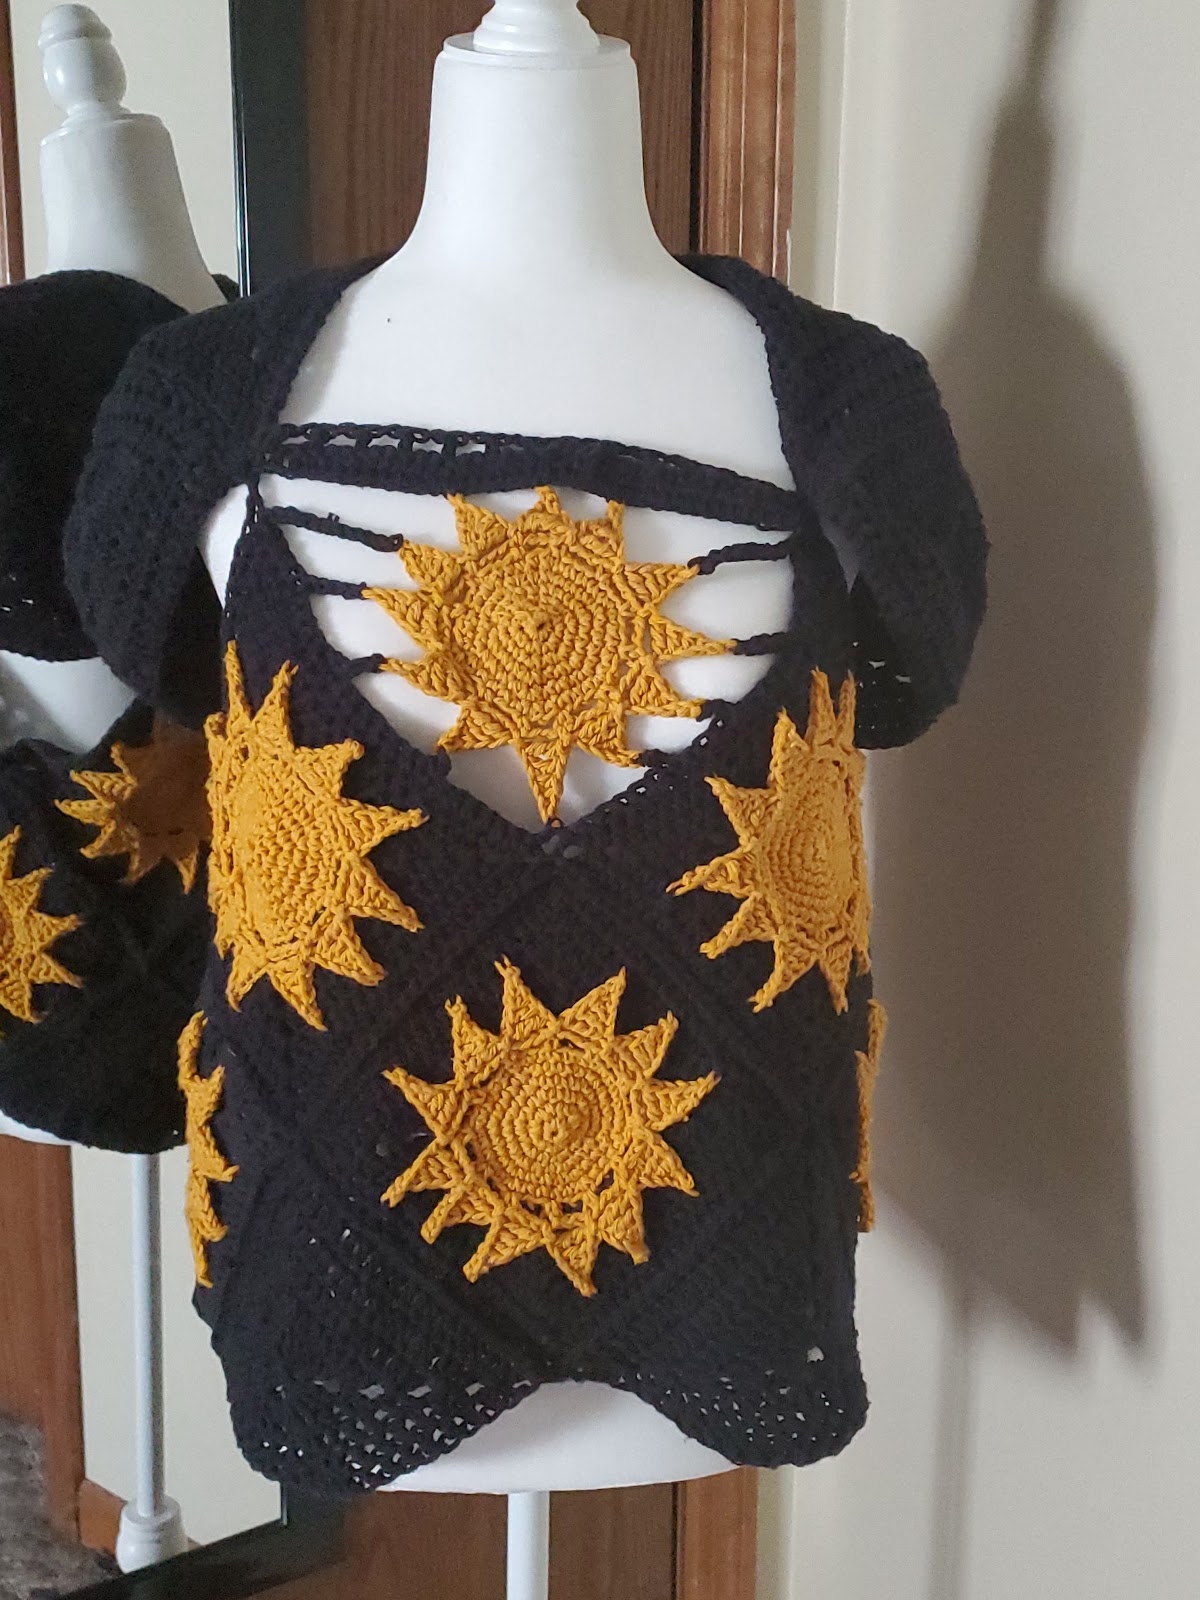
his pattern is to serve as a guide to create a unique granny square shirt, tunic or dress. The real “meat” of this pattern is how to sew your squares and triangles together to create your granny plate! You can use any granny square (or combination of squares) to make this shirt. I encourage you to be creative with this pattern, which is why I’m making it as more of a guide than an actual set pattern. I will provide a pattern for the triangles though.
Please be aware that the SQUARE WILL BE SIDEWAYS. For example, using a skull granny square may not produce the result you are looking for unless you work the skull as a diamond shape instead of a square shape. Here are some unique granny square pdfs that I think will give a nice roll playing aspect to this shirt:
Sun Granny Square (I used a 4.5mm hook instead of 5.0mm and on the 5th row of the square I stitched the sun rays into the square because they were curling inwards with cotton yarn): www.ravelry.com/dls/17182/236577
Use any yarn and any type of granny square to complete this pattern. You are going to need to make 9 granny squares for a v-neck shirt (13 for a tunic that would hit around the hip region, 17 for a mid thigh length, 21 for a knee length, 25 for a mid-calf length, and about 29 for a full length dress depending on your height!). Add one granny square or a unique motif/pattern to the chest like I did with the sun! Then you will have to make 10 or more granny triangles, I used 1 granny squares to make the sun granny plate that is pictured. 4 for the armholes/shoulder straps, 4 for the “plate-like” sleeves and 4 to go around the bottom of the garment.
You can be creative with the armholes and sleeves. Make it a long sleeve! Make a lacy pattern, maybe take the 2 triangles i did and add picot stitches or another lace pattern! Give it some crocodile stitches for a scale-like look! I am excited to see all that can be created with this pattern!
I used approximately 1400 yards of yarn to make a unisex size medium shirt. I used Worsted weight (category 4) yarn and a 4.0-5.5mm hook will work well with this yarn, I used a 4.5mm hook. You can use any size yarn and any size hook as long as you make the square the dimensions of the size you are making (See dimension recommendations below). If you don’t know how to change the gauge, just follow the recommended hook for your yarn and work until you get the size you need. Alternatively, you can make a custom size by measuring halfway under your armpit to the middle of your chest, and that will be the length of one side you need to make. The triangles will need to have the same side lengths as your square, with a little extra as not a bad thing to have (adding ~½” should be fine). Here are the sizes of the squares you need to make 9 of for a v-neck shirt, 10 for a crew cut shirt, and 17-18 (depending on neckline) of for a tunic: (All sizes are unisex sizes):
XS: ~ 5 inches/side
Small: ~ 6 inches/side
Medium: ~ 7 inches/side
Large: ~ 8 inches/side
XL: ~ 9 inches/side
2XL: ~ 10 inches/side
3XL: ~ 11 inches/side
4XL: ~ 12 inches/side
5XL: ~ 13 inches/side
Triangle Pattern is worked in the round (make 4 for filling in gaps for the body. An additional 2 can be made for the shoulder straps, and an optional 4 more can be made to create a plate-like t-shirt sleeve as described in the “sewing pieces together” section)
Ch-2 OR make a magic ring
Step 1: Ch-3 (counts as 1 dc), 5 more dc in ring. Slip st in 3rd ch from start(6st)
Step 2: Ch-3 (counts as 1 dc). Make a corner of (2dc, ch-1, 2 dc) in next st. *1 dc in next st, make corner* twice. Slip st to 3rd ch of beg ch-3.
Step 3: Ch-3 (counts as 1 dc). *1 dc in next sts until you reach the ch-1 space of the corner. Make a corner in the ch-1 space of the previous corner.* 3 times. 1dc in sts until beg ch-3. BE CAREFUL TO AVOID MAKING A STITCH IN THE SLIP ST OF THE PREVIOUS ROUND. Slip st in 3rd ch of beg ch-3. (# of sts increase by 12 per round).
Repeat step 3 until you have the necessary side length.
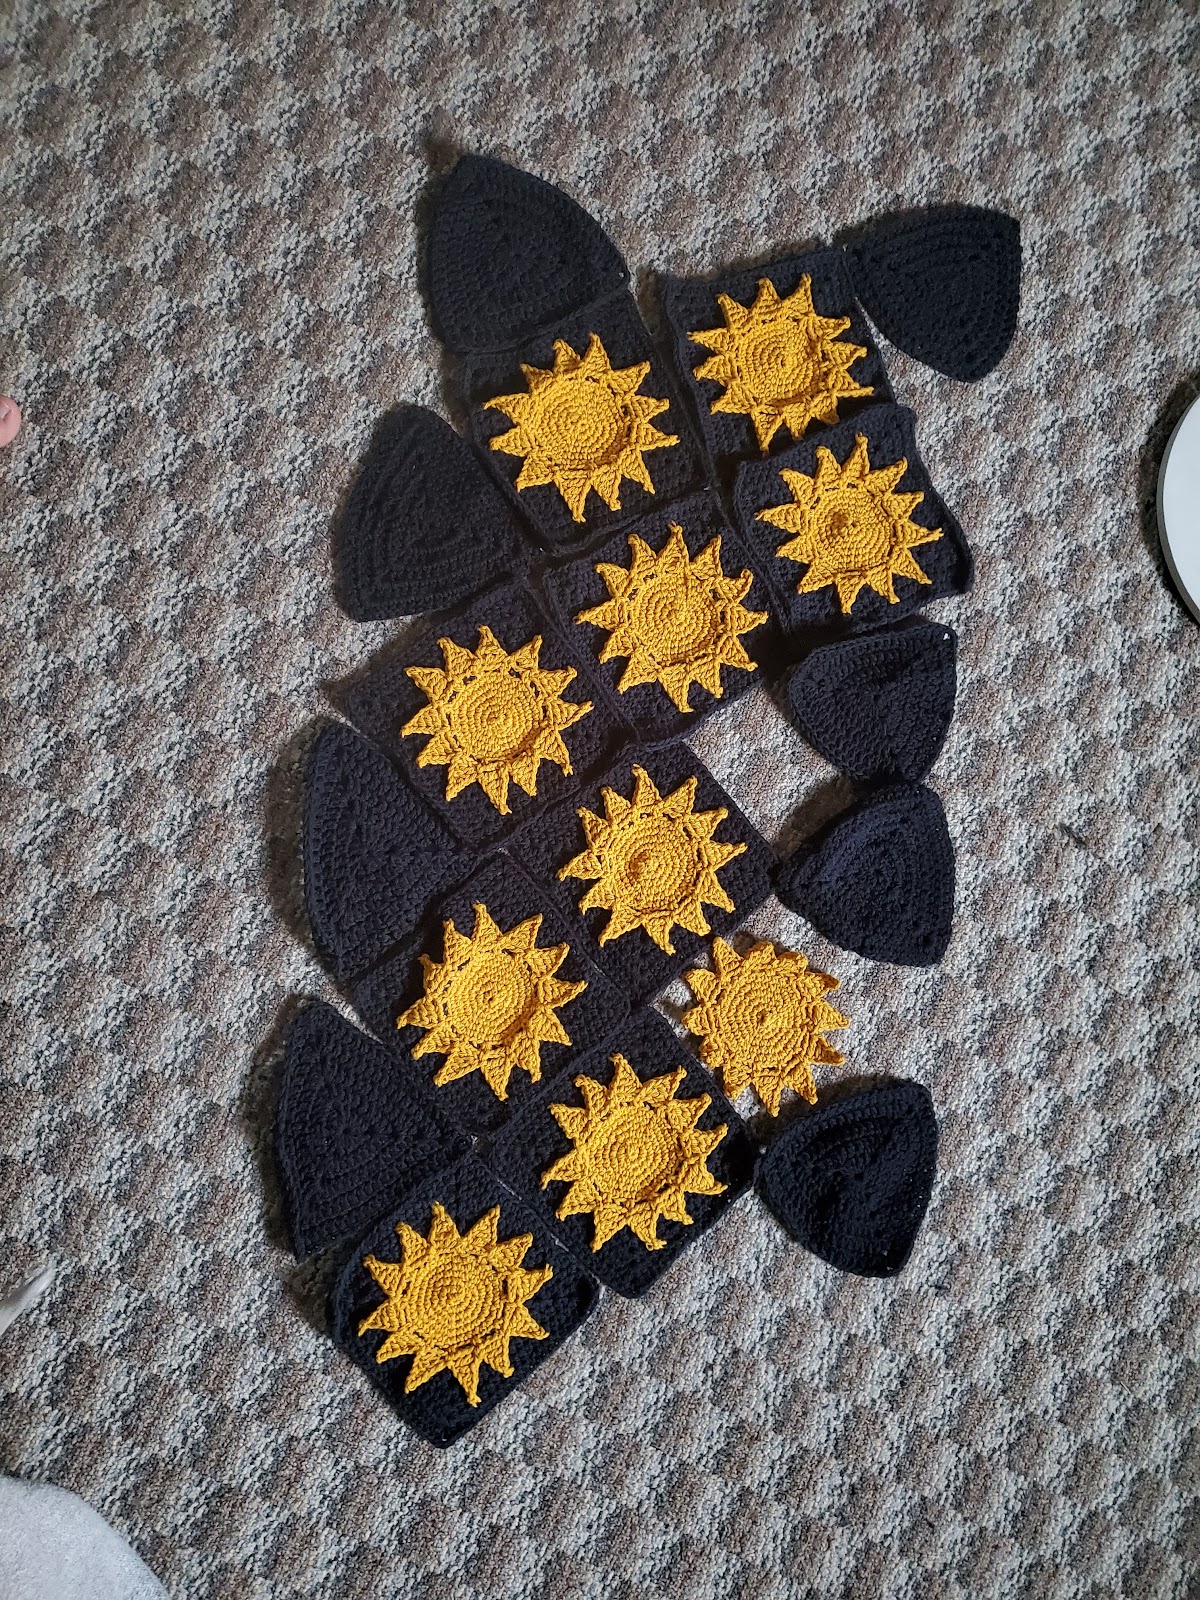
Sewing the squares together
So this is the general layout of how to sew the squares and triangles together:
There are 4 squares that make a row around the chest belly (and other areas if you are making a longer garment). *this saved me from improperly sewing some squares*
There is one square on top in the back and an optional square/mltif in the middle on the front. Here is what the front and back look like with just the squares and no triangles:
(Front) (Back)
I found it best to sew the squares together first.
Sewing the body triangles second.
Then sewing the garment together on the sides so it makes a shirt.
Then make the armholes/shoulder straps. There are some options for making these
You can make a band of as many rows as you need to reach the proper length depending on the appropriate size dimensions (5in-13in as stated in granny square side length above), in various thicknesses then sewing it onto the back for both sides. Can make it easier to create other sleeve types that have less of an armored look to them.
You could also chain as many stitches as you need to reach the appropriate dimensions (5in-13in as stated in granny square side length above), attach to the back where the top square and the middle square meet then sc or dc all the way back to the front and finish off on both sides. Can make it easier to create other sleeve types that have less of an armored look to them as well.
Alternatively you can make a more dynamic sleeve by using 2 granny triangles by sewing them on the tip of the front and the tip of the back and on the sides of the top granny square (as shown in red): Then sew the back and front triangles together. This as a more defined, armored look.
(Front with all triangles in red)
(Back with all triangles in red)
You can choose to leave it sleeveless, or you can add sleeves.
If you used the band or chain method described in the previous bullet points (option 1 or 2), you can work in the round to create sleeves of any length.
Alternatively you can make a sleeve that just sits on the shoulder by turning your work, or by sewing on two granny triangles by sewing the sides on the bands and sewing them together and repeating on the other side (4 granny triangles in total).
If you used option 3, and want to add sleeves, then follow these directions
Sew one triangle to each of the front shoulder straps
Sew one triangle to each the sides exposed of the top of the back of the shirt
Sew them together for a more armored look
Now you have some granny plate!
Add some details to your Granny Plate:
Make it padded by cutting foam and sewing it in between an additional granny square/triangle (multiply all granny square and triangle totals by 2)
Add a lace or picot border to the bottom, sleeves or other trim
Determine the neckline
Leave it blank for a v-neck
Add a granny square for a high neckline
Will have to chain across from shoulder to shoulder so that the corner stays up
This pattern is sized by measurements, so it can be customized to you! I provided a size chart below to select a general US size, this chart is based off of OpalMoon Designs sizes on their Etsy pages for the Panel Dress (see measurements in description here: https://www.etsy.com/listing/651303025/the-striped-panel-dress-in-black-sage?ref=shop_home_active_25&frs=1). This dress is not the original construction of the dress requires some sewing on the shoulders and sides, and there are some different options for sewing on the sides. If you use natural fibers, it will be stretchy enough to completely close the sides. The pattern on my ravelry store (https://www.ravelry.com/patterns/library/crochet-panel-dress) will have a stitch diagram, in this article I will provide written instructions, which will reference size chart measurements, and then I will add pictures to help you sew and construct your panel dress!
Yarn Used: Tahki Yarns Cotton Classics in Deep Red Violet. Any DK (category 3 weight) yarn will work, natural fibers (cotton, bamboo, etc) or blends with nylon will work best because it will stretch more to fit your body type.
~1500yds/1400m for sizes up to XL. ~1600m/1500m for 2XL & 3XL.
Size Chart for Front and Back Panel Measurements
XS/S
M
L
XL
XXL
3XL
Horizontal/Bust (x2 to determine appropriate size)
15.5″/39.4cm
17.5″/44.5cm
19.5″/49.5cm
20.5″/52cm
21.5″/54.6cm
23.5″/59.7
Vertical Length Front & Back before dec for neckline and Sleeves
40”/117cm
40.5”/118.3cm
41”/119.5cm
41.5”/120.8cm
42”/122.1cm
42.5”/123.4cm
Vertical total Length of Panels
50″/127cm
50.5″/128.3cm
51″/129.5cm
51.5″/130.8cm
52″/132.1cm
52.5″/133.4cm
Beginning Front/Back Panel: Ch, or foundation double crochet chain (https://www.mooglyblog.com/foundation-double-crochet-fdc/ for a tutorial), until you reach the horizontal length of your selected size from the size chart. Ensure this is an even number.
I recommend using a chainless double crochet instead of all the ch-2 indicated in the stitch chart (https://www.mooglyblog.com/chainless-starting-double-crochet/ for a tutorial), it will make the overall piece straighter. Otherwise you can choose to block the entire project with slip stitches all the way around.
Dc rows until you reach the vertical length for the selected size in the size chart. This is where the front and the back panels begin to differ:
Front Neckline (Fig. A): Dc in HALF of the stitches, then turn. *(Dc2tog in the second stitch and in the second to last stitch, this is considered a “dec row” from now on. Dc in every stitch in the next row, this is considered a “regular row” from now on.)* 3 times. Dec row until you either 1. Reach 6 stitches, or 2. Reach the final length (should be ~20 rows). Join yarn in the armpit area on the other side, and repeat on the other side. The picture below shows a finished Front Panel:
Back shoulders (Fig B.): “Dec row” every other row until you meet one of the following conditions: 1. You reach 12 stitches in your row, then dc until you reach the total vertical length in the size chart. 2. You reach the total vertical length in the size chart. Then you can finish off. The picture below shows a finished back Panel:
Sewing Front/Back Panels together:
Shoulders: start at outside edges and work towards the middle (as shown by the stitch markers in the image below
Sides: Start at first “dec row” on both front and back panels (shown by the stitch marker in the picture below). You can choose to sew the dress completely to the bottom for an ultra form-fitting dress. Or you can choose to stop somewhere on the upper thigh or hip to create the panel look, I recommend somewhere around 10”-15” (~25-38cm) from bottom to create a panel effect. Please customize this area of the dress. For a “looser” fit, do not completely pull the joining string tight, and gradually increase the space like a corset. Reminder: if you are using a natural stretchy fiber, it will automatically stretch and you may want to go down a size if you are choosing to go this route.
Here is an optional way to sew your panels together like a corset:
Sleeves: After sewing, join yarn in the bottom of the armpit (Fig C). *(Ch-3 and dc in each row all around) 3 times.
Ch-3, Dc2tog in every other st, all the way around (tip: if you find yourself ending on a dc2tog, join the 2nd dc to the 3rd st in the ch-3).
*(Ch-3 and dc in each row all around until you reach the crease of your arm or elbow (~25 rows).
Then sc in each stitch, you can choose to fasten off or continue with the panel portion.
Then you can begin the panel portion of the sleeve (Fig D). Ch-1, sc in half of the stitches.
Ch-2/chianless starting dc, dc until you reach the ch-2, then tr in next 2 stitches. Dc until you reach the last stitch in the round.
*(Turn and chainless starting dc/ch-2, dc2tog, dc in each dc st, tr in each tr st, dc in rest of dc st until third to last stitch, then dc2tog and dc in final dc. Turn and chainless starting dc/ch-2, dc in each dc st, tr in each tr, dc in rest of dc) Repeat until there are 20 stitches total, then repeat the dc-tr-dc stitch pattern until you reach the desired length. Fig. D shows how many rows are in the pictured dress.
Then ch-1, sc in each dc, and dc in each tr, sc in each dc. Ch-3, slip stitch in same stitch, slip stitch in each sc until middle dc of previous row, slip stitch in 1st dc and Ch-3, slip stitch in 2nd dc, slip stitch in each sc, then when you reach the last stitch slip stitch, ch-3, slip stitch, and fasten off.
Now you have a completed Panel Dress! You can add some other details such as blocking with slip stitches, or picot stitches on the neckline or around the base of the dress. The completed pictures feature a picot stitch around the neckline. Fringe may also be an interesting addition to this dress. If you want to add fringe, take a piece of cardboard the length that you want and wrap your yarn around it. Cut one side and then use your crochet hook to make a knot of the fringe. A more in-depth tutorial can be found here: https://www.wikihow.com/Add-Fringe-to-a-Crochet-or-Knit-Project. I encourage you to make this pattern your own and credit me for the base pattern. I hope you enjoyed making this pattern! If you want the stitch guide please purchase my pattern on https://www.ravelry.com/patterns/library/crochet-panel-dress
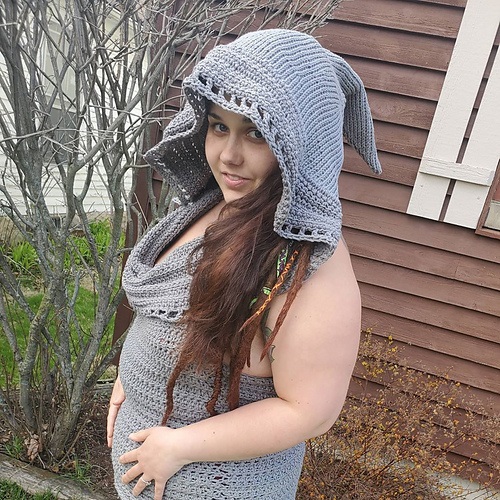
I began crocheting clothing a little less than a year ago. I had a hooded-tribal-style halter top that I loved to wear, yet wanted a different type of hood on it. One that was pointed.
I thought I would have to buy a sewing machine and learn how to sew to get the results I wanted in a top! Thankfully I just needed a little bit of creative thinking and to be inspired by some other wonderful crochet designer’s patterns in order to combine their patterns together to make my dream design!
I used the patterns linked below for the halter top and the hood. You can find the complete pattern at the end of this blog, I just want to give the original designers a shout out because they create beautiful patterns and works! So check out their blogs here:
I really liked the halter top, and didn’t like how the ties dug into my neck. So I wanted a different way to hold it up. An Elven-style hood was my go-to choice, and any hood can work great with this pattern! Since the two are worked separately you can work them independently of each other. Then I recommend connecting them together with the border first and then using stitch makers to determine exactly where you need it.
Type of Yarn is any weight category 4. I prefer a cotton yarn, or any other natural fiber over acrylic. Though the orange top is LionBrand Heartland yarn in yosemite and I used about 5-7 skeins of yarn to make this look in a size medium top.
The top is much longer than the pattern calls for, and you can just keep adding rows to determine exactly what length you want.
The Grey top is made with Lily sugar and creme yarn, which was made with a much shorter hood. I needed about 6-7 skeins of this yarn for a medium tunic-length top.
I used the types of hooks called for in the pattern. I used a 6.0mm (J) hook for the top. The hood can be made with a 6.5mm tunisian crochet hook or worked with regular sc with a 4.0mm hook.
One major difference between the orange and grey top is that I used Linked double crochet (ldc) and linked triple crochet (ltr) for the top, which made it less see-through.
Here is the pattern I used, you can adjust the lengths of the top and the hood as needed/desired for length. The hood and the top are worked separately. The border is then worked around the finished hood and top and then sewn together to get the most accurate placing.
SIZES: Small, Medium, Large, and XL with a Short Hood or a Long Hood (any hood can be attached to this pattern)
Halter Top: FINISHED MEASUREMENTS (in inches) To Fit Bust – 32-34(36-38, 40-42, 44-46)
To Fit Waist – 24-26(28-30, 32-34, 36-38)
Finished Width – 15(16, 17. 18)
Finished Torso Length – 16(16, 16, 16)
Finished Bust Length – 14(14, 16, 16)
NOTES This top is worked from the bottom up in one piece There are four sizes to this pattern: Small, Medium, Large, and XL Follow the numbers in parentheses for the larger sizes: S(M,L,XL) The ch 2 at the beginning of a round does NOT count as a stitch The ch 4 at the beginning of a row DOES count as a tr Turning at the end of each round on the Torso ensures that your join seam stays nice and straight – this join seam will run down the side of your top dc st can be replaced with linked double crochet (ldc) or linked triple crochet (ltr) to make top less see-through.
TORSO Round 1: Fdc 78(84,90,96). Join with a slst to first fdc. Turn.
Round 2: Ch 2 and (l)dc in the first st. (L)Dc in every st around. Join with a slst to first dc. Turn.
Rounds 3-25: Repeat round 2 twenty-three more times. (I added ~12 rows to get to the length pictured)
Note: if you want more length you can add as many rounds as you want here CONTINUE TO BUST WITHOUT FASTENING OFF.
BUST Row 1: Ch 4. Tr (or ltr) in the next 38(41,44,47) sts. Turn (leaving the remaining sts unworked).
Row 2: Ch 4 and (ltr)/tr in the same st. (Ltr)/Tr in each st up to the last st. 2 tr in the last st. Turn.
Rows 3-14(14,16,16): Repeat row 2 twelve(twelve,fourteen,fourteen) more times. Note: Each row will increase by 2 sts.
HOOD The hood is worked separately. It can be lengthened or shortened by removing the extra rows between the increases, this is the pattern for the long hood (pictured above in orange). The pattern below is for the Tunisian version of this pattern, which is done with a 6.5mm Tunisian crochet hook. A similar effect can be make with a 4.0mm (G) regular crochet hook and using sc.
Ch 3. Row 1: Draw up a loop from the back of each of the next 2 chain stitches. RP. – 3 sts Row 2: TKS inc in the first space. TKS in the next st. TKS inc in the next space. TKS in the final st. RP. – 5 sts Rows 3-4: TKS in ea st across. RP. – 5 sts Row 5: TKS inc in the first space. TKS in the next 3 sts. TKS inc in the next sp. TKS in the final st. RP. – 7 sts Rows 6-7: TKS in ea st across. RP. – 7 sts Row 8: TKS inc in the first sp. TKS in the next 5 sts. TKS inc in the next sp. TKS in the final st. RP. – 9 sts. Rows 9-10: TKS in ea st across. RP. – 9 sts Row 11: TKS inc in the first sp. TKS in the next 7 sts. TKS inc in the next sp. TKS in the final st. RP. – 11 sts Row 12-13: TKS in ea st across. RP. – 11 sts Row 14: TKS inc in the first sp. TKS in the next 9 sts. TKS inc in the next sp. TKS in the final st. RP. – 13 sts Rows 15-16: TKS in ea st across. RP. – 13 sts Row 17: TKS inc in the first sp. TKS in the next 11 sts. TKS inc in the next sp. TKS in the final st. RP. – 15 sts Rows 18-19: TKS in ea st across. RP. – 15 sts Row 20: TKS inc in the first sp. TKS in the next 13 sts. TKS inc in the next sp. TKS in the final st. RP. – 17 sts Row 21-22: TKS in ea st across. RP. – 17 sts Row 23: TKS inc in the first sp. TKS in the next 15 sts. TKS inc in the next sp. TKS in the final st. RP. – 19 sts Rows 24-25: TKS in ea st across. RP. – 19 sts Row 26: TKS inc in the first sp. TKS in the next 17 sts. TKS inc in the next sp. TKS in the final st. RP. – 21 sts Rows 27-28: TKS in ea st across. RP. – 21 sts Row 29: TKS inc in the first sp. TKS in the next 19 sts. TKS inc in the next sp. TKS in the final st. RP. – 23 sts Rows 30-31: TKS in ea st across. RP. – 23 sts Row 32: TKS inc in the first sp. TKS in the next 21 sts. TKS inc in the next sp. TKS in the final st. RP. – 25 sts Rows 33-34: TKS in ea st across. RP. – 25 sts Row 35: TKS inc in the first sp. TKS in the next 23 sts. TKS inc in the next sp. TKS in the final st. RP. – 27 sts Rows 36-37: TKS in ea st across. RP. – 27 sts Row 38: TKS inc in the first sp. TKS in the next 25 sts. TKS inc in the next sp. TKS in the final st. RP. – 29 sts Rows 39-40: TKS in ea st across. RP. – 29 sts Row 41: TKS inc in the first sp. TKS in the next 27 sts. TKS inc in the next sp. TKS in the final st. RP. – 31 sts Rows 42-43: TKS in ea st across. RP. – 31 sts Row 44: TKS inc in the first sp. TKS in the next 29 sts. TKS inc in the next sp. TKS in the final st. RP. – 33 sts Row 45-46: TKS in ea st across. RP. – 33 sts Row 47: TKS inc in the first sp. TKS in the next 31 sts. TKS inc in the next sp. TKS in the final st. RP. – 35 sts. Rows 48-49: TKS in ea st across. RP. – 35 sts Row 50: TKS inc in the first sp. TKS in the next 33 sts. TKS inc in the next sp. TKS in the final st. RP. – 37 sts. Rows 51-52: TKS in ea st across. RP. – 37 sts Row 53: TKS inc in the first sp. TKS in the next 35 sts. TKS inc in the next sp. TKS in the final st. RP. – 39 sts Rows 54-55: TKS in ea st across. RP. – 39 sts Row 56: TKS inc in the first sp. TKS in the next 37 sts. TKS inc in the next sp. TKS in the final st. RP. – 41 sts Rows 57-58: TKS in ea st across. RP. – 41 sts Row 59: TKS inc in the first sp. TKS in the next 39 sts. TKS inc in the next sp. TKS in the final st. RP. – 43 sts Rows 60-61: TKS in ea st across. RP. – 43 sts Row 62: TKS inc in the first sp. TKS in the next 41 sts. TKS inc in the next sp. TKS in the final st. RP. – 45 sts Rows 63-64: TKS in ea st across. RP. – 45 sts Row 65: TKS inc in the first sp. TKS in the next 43 sts. TKS inc in the next sp. TKS in the final st. RP. – 47 sts Rows 66-67: TKS in ea st across. RP. – 47 sts Row 68: TKS inc in the first sp. TKS in the next 45 sts. TKS inc in the next sp. TKS in the final st. RP. – 49 sts Rows 69-70: TKS in ea st across. RP. – 49 sts Row 71: TKS inc in the first sp. TKS in the next 47 sts. TKS inc in the next sp. TKS in the final st. RP. – 51 sts Rows 72-73: TKS in ea st across. RP. – 51 sts Row 74: TKS inc in the first sp. TKS in the next 49 sts. TKS inc in the next sp. TKS in the final st. RP. – 53 sts Rows 75-76: TKS in ea st across. RP. – 53 sts. Row 77: TKS inc in the first sp. TKS in ea of the next 12 sts. (TKS inc in the next sp. TKS in ea of the next 13 sts) 3 times. TKS inc in the next sp. TKS in the final st. RP. – 58 sts Rows 78-79: TKS in ea st across. RP. – 58 sts Row 80: TKS inc in the next sp. TKS in ea of the next 14 sts. (TKS inc in the next sp. TKS in ea of the next 14 sts) 3 times. TKS inc in the next sp. TKS in the final st. RP. – 63 sts. Rows 81-82: TKS in ea st across. RP. – 63 sts Row 83: TKS inc in the next sp. (TKS in ea of the next 15 sts. TKS inc in the next sp) 4 times. TKS in ea of the next 2 sts. RP. – 68 sts Rows 84-85: TKS in ea st across. RP. – 68 sts Row 86: TKS in the next st. (TKS inc in the next sp. TKS in ea of the next 16 sts) 4 times. TKS inc in the next sp. TKS in ea of the next 2 sts. RP. – 73 sts Rows 87-88: TKS in ea st across. RP. – 73 sts Row 89: TKS in the next st. (TKS inc in the next sp. TKS in ea of the next 17 sts) 4 times. TKS inc in the next sp. TKS in the next 3 sts. RP. – 78 sts. Rows 90-91: TKS in ea st across. RP. – 78 sts Row 92: TKS in ea of the next 2 sts. (TKS inc in the next sp. TKS in ea of the next 18 sts) 4 times. TKS inc in the next sp. TKS in the next 3 sts. RP. – 83 sts Rows 93-94: TKS in ea st across. RP. – 83 sts Row 95: TKS in ea of the next 2 sts. (TKS inc in the next sp. TKS in ea of the next 19 sts) 4 times. TKS inc in the next sp. TKS in ea of the next 4 sts. RP. – 88 sts Rows 96-97: TKS in ea st across. RP. – 88 sts Row 98: TKS in ea of the next 3 sts. (TKS inc in the next sp. TKS in ea of the next 20 sts) 4 times. TKS inc in the next sp. TKS in ea of the next 4 sts. RP. – 93 sts Rows 99-100: TKS in ea st across. RP. – 93 sts Row 101: TKS in ea of the next 3 sts. (TKS inc in the next sp. TKS in ea of the next 21 sts) 4 times. TKS inc in the next sp. TKS in ea of the next 5 sts. RP. – 98 sts Rows 102-103: TKS in ea st across. RP. – 98 sts Rows 104-121: TKS in ea st across. RP. – 98 sts
Cut yarn and tie off.
Seaming the Hood
Fold the large triangle down the center length so that the right sides of the fabric are facing each other and the wrong sides are out. With a tapestry needle and a length of yarn, make a whip stitch seam starting at the point of the hood until there are ~25-30 rows remaining.
Connecting the Hood and Top
Border
Start with the border to connect the top.
Attach yarn on edge of hood or top, ch-2, then work a in-the-round border of at least 4 rounds of ldc slst in top of beg of each ch-2 at beginning of round. Turn to add an extra round of ldc over the hood only for a larger hood effect. Add as much of a border as you want here! I wouldn’t go more than 8 rounds here though, I have only done a total of 5 rows (including the extra round on the hood). Ch-4, dc, sk a chain, ch-1 all the way around slst in 3rd chain of beg ch-4. Then ch-1, sc in ea sc and dc all the way around, slst in beg ch-1. Tie off and weave in ends.
Sewing the pieces together
I definitely recommend using stitch markers to place your hood and try it on prior to sewing if possible! This pattern is untested, and has only been worn by me. Since the border holds the hood and the top together, this should make this process easier. This is how it worked well for me:
I left ~10 stitches of the hood unworked and unsewen to be able to pull it over my head. I sewed the hood on starting between the 5th and 6th rows of tr crochets on the top. I sewed 2-3 st on the hood in one tr on the top using a mattress stitch going forward and backwards, so the knot to finish off is in the back of the hood. Then finish off.
Now you have an Elven Hooded Halter Top!
Someone on ravelry is combining this with a dragon hood, and it inspired me to make a dragon version too with some sage green yarn! Check out my ravelry when the project is finished!
~T
Update as of 6/26/20: I have an ad-free PDF version available in my Ravelry shop
Have no idea what YOU can do to help the environment? Climate change? The Australian Bush fires?
Here’s something easy you can use in your everyday life. Switch your internet search engine to Escosia. For every few searches, they plant trees!
Plus every AD click plants more trees!!!
And today, January 23rd, all proceeds go to help rebuild the Australian Bush.
I have the search engine installed in my phone. There’s even an android widget for searches. Plus you can use it as a mobile browser!
If you prefer searching on a computer there is a plugin so you can use it in your favorite browser! Just set it as your preferred search engine to start planting!


 (Front)
  (Back)
 (Front with all triangles in red)
 (Back with all triangles in red)